서블릿 파라미터 설정은 <servlet>태그 내에 <init-param>으로 할 수 있다.
하지만 이렇게 각각 서블릿에서 사용되는 파라미터 대신
Context단위로 파라미터 설정하여 여러 서블릿에서 공유하여 사용될 수 가 있다.
방법은 web.xml에서 <context-param> 태그를 이용하는 것이다.
<context-param>
<param-name>conParam</param-name>
<param-value>conSharedValue</param-value>
</context-param>
param-name, param-value는 <init-param>과 동일하다.
저렇게 web.xml에 선언한 context단위 파라미터는 ServletContext객체를 통해 접근할 수 있는데, 서블릿에 getServletContext() 메소드로 얻어올 수 있다.
getServletContext().getInitParameter("<param-name>");
위와 같이 context객체를 통해 getInitParameter메소드 호출하는것은 servlet 파라미터 가져오는 것과 동일하다.
1. 테스트할 서블릿 만들기
ServletA.java
1 2 3 4 5 6 7 8 9 10 11 12 13 14 15 16 17 18 19 20 21 22 23 24 25 26 27 28 29 30 31 32 33 34 35 36 37 38 | package com.exam.svl2; import java.io.IOException; import javax.servlet.ServletException; import javax.servlet.annotation.WebInitParam; import javax.servlet.annotation.WebServlet; import javax.servlet.http.HttpServlet; import javax.servlet.http.HttpServletRequest; import javax.servlet.http.HttpServletResponse; @WebServlet(urlPatterns="/serA", initParams={@WebInitParam(name="name",value="ServletA")}) public class ServletA extends HttpServlet { private static final long serialVersionUID = 1L; private String sharedContextParam; private String servletParam; @Override public void init() throws ServletException { sharedContextParam = getServletContext().getInitParameter("conParam"); servletParam = getInitParameter("name"); } @Override protected void doGet(HttpServletRequest req, HttpServletResponse resp) throws ServletException, IOException { resp.setContentType("text/html"); resp.getWriter().append("<html>") .append("<head></head>") .append("<body>") .append("<h1>").append(servletParam).append("</h1><br>") .append("<h2>").append(sharedContextParam).append("</h2>") .append("</body>"); } } | cs |
ServletB.java
1 2 3 4 5 6 7 8 9 10 11 12 13 14 15 16 17 18 19 20 21 22 23 24 25 26 27 28 29 30 31 32 33 34 35 36 37 38 | package com.exam.svl2; import java.io.IOException; import javax.servlet.ServletException; import javax.servlet.annotation.WebInitParam; import javax.servlet.annotation.WebServlet; import javax.servlet.http.HttpServlet; import javax.servlet.http.HttpServletRequest; import javax.servlet.http.HttpServletResponse; @WebServlet(urlPatterns="/serB", initParams={@WebInitParam(name="name",value="ServletB")}) public class ServletB extends HttpServlet { private static final long serialVersionUID = 1L; private String sharedContextParam; private String servletParam; @Override public void init() throws ServletException { sharedContextParam = getServletContext().getInitParameter("conParam"); servletParam = getInitParameter("name"); } @Override protected void doGet(HttpServletRequest req, HttpServletResponse resp) throws ServletException, IOException { resp.setContentType("text/html"); resp.getWriter().append("<html>") .append("<head></head>") .append("<body>") .append("<h1>").append(servletParam).append("</h1><br>") .append("<h2>").append(sharedContextParam).append("</h2>") .append("</body>"); } } | cs |
ServletA와 ServletB는 사실 코드는 동일하고, 어노테이션으로 초기화 인자를 설정할때 둘다 "name" 이름이지만, 값은 각각 다르다.
그리고 getServletContext().getInitParameter() 메소드로 컨텍스트 파라미터를 가져오고 있다.
2. web.xml에 컨텍스트 파라미터 설정
conParam이름에 sharedContextParameter라는 값을 갖는 컨텍스트 파라미터를 설정했다.
3. 확인
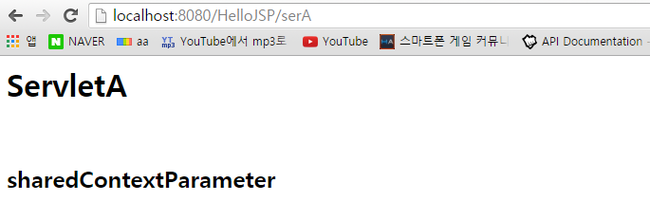
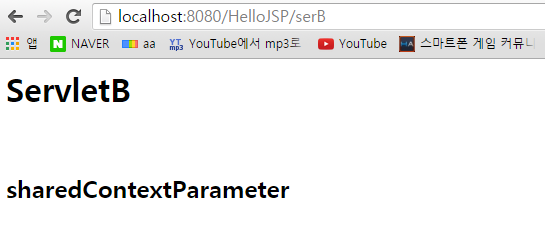
각각 접속해서 어떤 화면이 출력돼는지 확인해보자
http://localhost:8080/컨텍스트이름(프로젝트이름)/serA

http://localhost:8080/컨텍스트이름(프로젝트이름)/serB

위와 같이 servlet 파라미터를 출력한 결과는 각각의 initParams에 정의한 내용대로 다름을 확인할 수 있고
context 파라미터를 출력한 결과는 두 서블릿이 동일함을 알 수 있다.
# 서블릿의 doGet에 처리내용
resp.setContentType("text/html")
응답될 내용이 html형태라는 것을 명시해 주는것이다. 아무런 명시를 하지않으면 그냥 문자열로 취
급하지만, 명시 해줌으로써 문자열들이 html코드임을 웹브라우저가 알게한다.
그 뒤로 resp.getWriter().append를 통해 html코드를 적어주고 있다. println으로 해도 마찬가지지만
append를 사용하면 getWriter의 Writer객체를 반환해주기때문에 계속 메소드를 호출해서 위 예제코드처럼 작성할 수 있음.
이렇게 서블릿은 HttpServletResponse객체를 통해 동적인 html 웹페이지를 만들어 줄 수 있다.
하지만 코드에서 보드시 저정도 페이지 만드는데도 상당히 불편한 점이 많은데, 복잡한 웹페이지는 더더욱 곤란해진다.
그래서 나온것이 JSP이다
'Back-End > JSP' 카테고리의 다른 글
| JSP 란? (1) | 2018.09.17 |
|---|---|
| 서블릿 초기화 파라미터(ServletConfig) (0) | 2018.09.17 |
| JSP Servlet 한글 인코딩 처리 (0) | 2018.09.17 |
| Servlet 기본 및 예제 (0) | 2018.09.17 |
| JSP에서의 MVC 모델1, 모델2 (0) | 2018.09.17 |